|
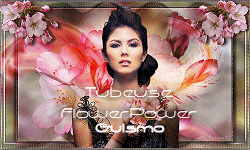
Tutorial Sweet
Temptation

Este
tutorial foi criado no PSP X2, mas pode ser feito em
qualquer versão.
Tutorial
criado por Jana Saucedo® em 18 de agosto de 2009.
Proibida cópia ou vinculação sem
autorização da autora.

Tubes:
By Guismo do grupo
Flower Power Guismo
By Ivory Tubes
By Irene
Mask By
Denise Worisch
Aqui está outra
versão feita com o meu tutorial:
Material:
Plugins Usados:
Alien Skin
Xenofex 2 - Constellation
Aqui
Efeitos do
PSP
|
Use a seta para acompanhar o
tutorial.

|
Roteiro:
1. Abra uma
nova imagem transparente 800 x 600 px
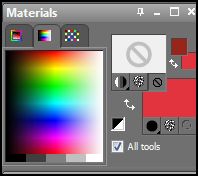
Configure na
paleta de materiais:
Foreground:
#98261c ( cor escura)
Background:
#e1343e (cor clara)
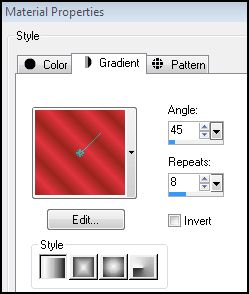
Forme um
gradiente Linear:
Angle: 0
Repeat: 1
Flood fill (baldinho)
na imagem.
2. Layer -
New raster layer
Select all
Abra o tube
"calguisdiablesse1189" - Copy
Paste into
selection - select none
Effects -
Image effects - Seamles tiling
Adjust -
Blur - Radial blur:
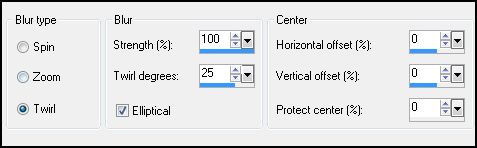
Edge effects
- Enhace
Effects -
User defined filter - Emboss 3
3. New
raster layer
Flood fill
com o gradiente novamente
Abra a mask
fornecida no material "atag2dworisch" - Minimize
Layers - New
Mask Layer - From Image:
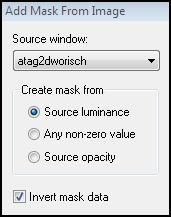
Layer -
Merged group
Edge effects
- Enhace more
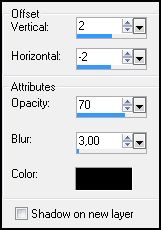
Drop shadow:
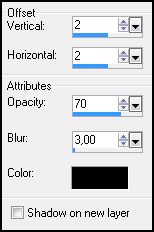
Repita o
drop shadow mudando os valores de V e H para: -2
Duplicate 2
vezes nessa layer e renomeie para mask1, mask2 e mask3:
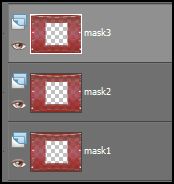
Ative a
Layer superior "mask3"
4. Ative a
ferramenta magic wand (varinha mágica), Tolerance: 30
Clique
denttro do quadrado da mask 2 vezes ou até que a parte
interna fique toda selecionada.
New Raster
Layer
Abra o tube
"DI_tube641" - Copy
Paste into
selection - select none
Diminua a
opacidade para 75
5. Abra o
tube do casal "IDI[MIST]Couple1" - Copy
Paste as new
layer
6. Abra o
accent "accent_hearts_JS" - Copy
Paste as new
layer
Adjust - Hue
and Saturation - Colorize:

Posicione na
parte de cima da mask (veja tag final)
Drop shadow
à seu gosto
7. Abra o
tube "1-fly-dies30" - Copy
Paste as new
layer
Posicione na
parte de baixo da imagem (veja tag final)
Drop shadow
à seu gosto.
8. Copy
novamente no tude da mulher "calguisdiablesse"
Paste as new
layer
Image -
resize em 75% com all layers desmarcado
Sharpness -
Sharpen
Image -
mirror
Posicione no
lado esquerdo da imagem (veja tag final)
Drop shadow
à seu gosto
9. New
raster layer
Ative a
ferramenta texto (preste atenção no íten "Direction"):

Na paleta de
materiais deixe o foreground null:
Escreva seu
texto, e posicione no lado direito da imagem (veja tag
final)
Select all -
float - defloat
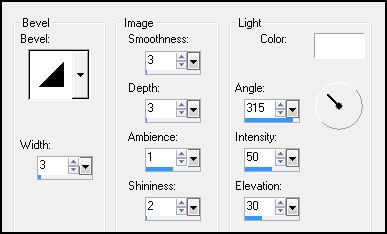
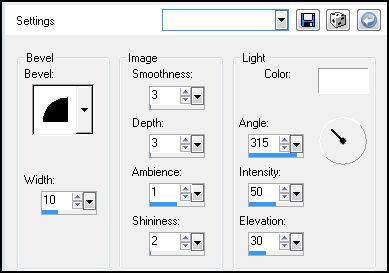
3D effects -
Inner Bevel:
Drop Shadow:
Select none
10. New
raster layer
Select all -
Modify - Contract: 4
Selection -
Invert
Mude a
configuração do gradiente:
Flood fill
na seleção
3D effects -
Inner bevel:
Select none
Drops shadow
à seu gosto, mas não esqueça de trocar os valores de V e
H para negativos.
11. Ative a
layer mask1
Effects -
Plugins - Alien Skin Xenofex 2 - Constellation:
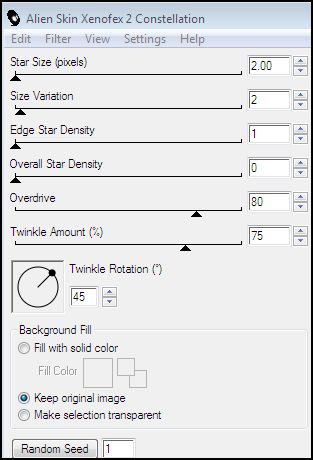
Ative a
layer mask2, e repita o íten anterior, apenas clicando
em Random Seed
Ative a
layer mask 3, e faça o mesmo processo anterior, apenas
clicando em Random Seed
Feche a
visibilidade das layers mask2 e mask3
Ative a
mask1 - copy merged
Abra o
Animation Shop - paste as new animation
Volte ao PSP
Feche a
visibilidade da layer mask1 e abra a da mask2
Ative a
mask2 - copy merged
Abra o
Animation Shop - paste after current frame
Volte ao PSP
Feche a
visibilidade da layer mask2 e abra a da mask3
Ative a
mask3 - copy merged
Abra o
Animation Shop - paste after current frame
Edit -
select all
Animation -
Frame Properties: 20
View
animation
Se já
estiver satisfeito, salve como GIF.
E está
pronto!!!
MENU
MEUS TUTORIAIS
Design by Jana Saucedo®
Copyright© 2009 by Jana Saucedo
Todos os direitos reservados.
|
