
Tutorial
Special

Materiais

Download plugin Alien Skin Xenofex2
Aqui
Tutorial
original nesse site

Coloque a mask:
zuzzanna_mask63 em sua pasta de mask
Abra uma nova imagem 600/450 pixels
Foreground color #000000 e background #808080
Faça um gradiente nessas configurações:
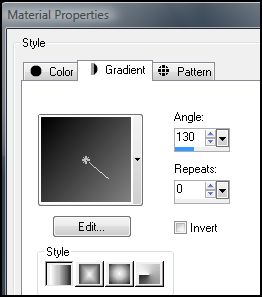
Flood fill (baldinho) em sua imagem com o gradiente
Layers-new raster
Flood fill com #000000
Layers-Load/save mask-Load mask from disk
Aplique a mask: zuzzanna_mask63 com essas configurações:

Ok
Layers-merge-merge group
Duplique essa Layer duas vezes
Selecione a Layer group-raster1
Effects-plugins-Alien Skin Xenofex2-constellation com essas
configurações:
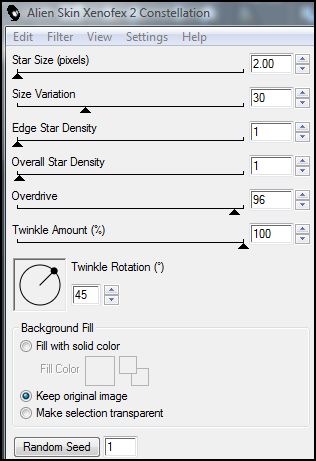
Ok
Selecione a Layer com o nome Copy of group
Effects-Alien skin Xenofex2-constellation com as mesmas
configurações anteriorer e clique em Random.
Ok
Selecione a Layer com o nome Copy (2) of group
Effects-Alien skin Xenofex2-constellation com as mesmas
configurações anteriores e clique em Random.
Ok
Abra o Tube Bg2special
Edit-copy
Edit-paste as new layer
Layer-Load/save mask-load mask from disk com as mesmas configurações
anteriores.
Ok
Layers-merge-merge group
Abra o Tube @SB@-HotGuy
Edit-copy
Edit-paste as new layer
Image-resize nessas configurações:
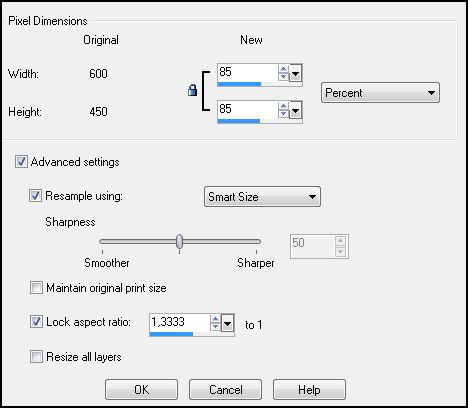
Ok
Mova o tube no lugar com a ferramenta move tool
Mude o Blend mode dessa layer para burn
Abra o Tube WordArtAimelleCreation_text01
Selecione o texto que irá usar
Edit-copy
Edit-paste as new layer
Image-resize 80% com All Layers desmarcado
Use move tool para mover seu texto para o lugar.
Abra o Tube Mtm_transparante_tube37_Gentian_1_Ma_2006
Edit-copy
Edit-paste as new layer
Image-resize 30% com All layers desmarcado
Use move tool para mover para o lugar
Abra o tube jet-woman4-november-2007
Edit-copy
Edit-paste as new layer
Image-resize 75% com All layers desmarcado
Use move tool para mover para o lugar.
Layers-new raster layer
Selections-select all
Selections-modify-contract: 2
Selections-invert
Flood fill com a cor #c0c0c0
Selections-select none
Adicione sua assinatura.
Na Layers palette, selecione a layer com o nome Group-Raster 1
e feche a layer
com o nome Copy of Group and Copy of group 2
Edit-copy merged
Abra o Animation shop
Edit-paste-as new animation
Volte para paint shop pro
Selecione a layer com o nome Copy of Group e feche a
layer Group raster 1
e a layer Copy of group 2
Edit-copy merged
No Animation shop
Edit-paste before current layer
Volte para o paint shop pro
Selecio a Layer com o nome Copy of group 2 e feche a layer
Copy of group
e a layer Group raster 1
Edit-copy meged
No Animation shop
Edit-paste before current layer
Edit-select all
Animation-Frame Properties em: 15
Animation-View animation
Se ficar satisfeito com a sua animação,
Salve seu gif e pronto! :)
Design by Jana Saucedo®
Copyright© 2009 by Jana Saucedo
Todos os direitos reservados.
