|
Use a seta para acompanhar o
tutorial.

|
Roteiro:
1. Abra o
Wordart "wordart_natal"
File - Export -
Custom brush e renomeie para "merry_christmas":
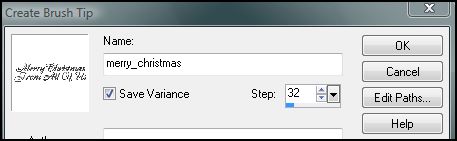
Dê OK
Pode fechar o
wordart sem salvar.
2. Abra uma nova
imagem transparente de 900 x 600 px.
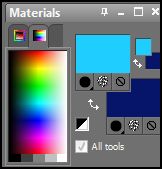
Configure na
paleta de materiais:
Foreground:
#061769 (cor escura)
Background:
#1fcdff (cor clara)
Forme um
gradiente Linear - Angle: 0 - Repeat: 1
Flood fill na
imagem
Adjust - Blur -
Gaussian blur: 15,00
3. New raster
layer
Select all
Abra o tube "Cherokee~GoldenDangles"
- Copy
Paste into
selection - select none
Effects - Image
effects - Seamless Tiling - Default
Mude o blend
mode para Overlay
Diminua a
opacidade para 50 ou à seu gosto.
4. New raster
layer
Mude a
configuração do gradiente Linear para Angle: 45 - Repeat: 20
Flood fill na
imagem
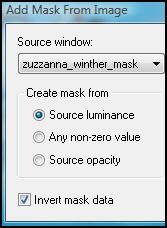
Abra a mask "zuzzanna_winther_mask"
- Minimize
Layers - New
Mask Layer - From Image
Layers - Merged
Group
Effects - User
Defined Filter: Emboss_6
5. Ative a
ferramenta selection - custom selection:
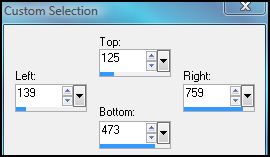
Aperte a tecla
DEL no teclado e mantenha selecionado
New raster layer
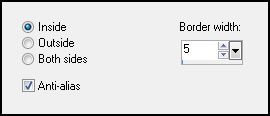
Selections -
Modify - Selection Select border:
Flood fill com o
mesmo gradiente que usamos no passo 4
Emboss_6
Select none
6. Ative a layer
da mask e duplique duas vezes
Renomeie essas
layers para M1, M2 e M3
Ative a layer
superior da borda
Com a ferramenta
magic wand clique dentro do retângulo para que fique
selecionado
Abra o tube
"calguismistnoel12119" - Copy
Paste into
selection - select none
Effects -
Plugins - FM Tile Tools - Blend Emboss - Default
7. Abra o tube
"calguismerenoel10119" - Copy na layer da mulher
Paste as new
layer
Resize em 75%
com all layers desmarcado
Posicione um
pouco para a esquerda (veja tag final)
Colorize - H:
137 - S: 255
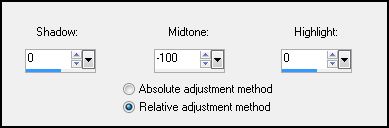
Brightness and
Contrast - Highlight/Midtone/Shadow:
8. New raster
layer
Inverta as cores
do foreground e background:
Ative a
ferramenta Paint Brush e selecione o brush que salvamos no
passo 1

Aplique na tag
onde desejar
User Defined
Filter: Emboss_3
Drop Shadow 2
vzs na configuração que desejar
Adicione sua
assinatura ou marca d'água.
9. New raster
layer - select all
Modify -
Contract: 10 - Invert
Flood fill na
seleção com o gradiente como usamos no passo 4
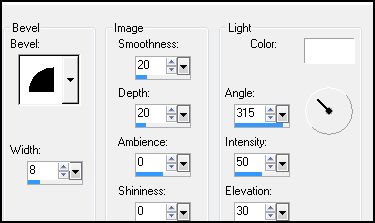
3D effects -
Inner Bevel:
Select none
10. Ative a
layer da mask M1
Effects -
Plugins - Xero - Bad Dream:
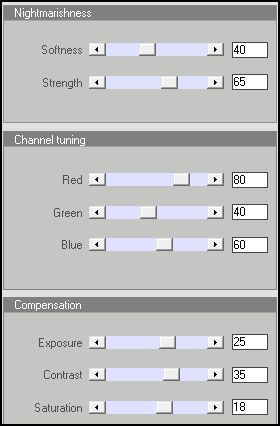
Ative a layer M2
Novamente
aplique o efeito Bad Dream, e dessa vez apenas mude a
confuguração do Exposure:

Ative a layer M3
Aplique
novamente o mesmo efeito mudando o valor de Exposure para: 0
11. Feche a
visibilidade das layers M2 e M3
Ative a layer M1
- Copy Merged
Abra o Animation
Shop - Paste as new animation
Volte ao PSP
Feche a
visibilidade da Layer M1 e abra da layer M2
Ative a layer M2
- Copy merged
Abra o AS -
paste after current frame
Volte ao PSP
Feche a
visibilidade da Layer M2 e abra da layer M3
Ative a layer M3
- Copy merged
Abra o AS -
paste after current frame
View - Animation
Se já estiver
satisfeito, salve como GIF.
E está pronto.

MENU
MEUS TUTORIAIS
Design by Jana Saucedo®
Copyright© 2009 by Jana Saucedo
Todos os direitos reservados.